


DISCLAIMER: If you are not good with electrical equipment, panels and wiring, please do NOT do this yourself, hire a licensed electrician. SemoTech and all associated staff and entities are not responsible for any injury or property damage, resulting from you trying this yourself.
Pool controls for single speed pumps have not changed in a long time and most use a mechanical timer with a time wheel. While very reliable, these devices are not remotely controllable and require manual selection and configuration of start and stop times. Turning it on/off is also manual and requires a trip to the power box by the pool equipment. Switching to a Variable Speed Pump will negate the need for this project as they require always on power and have built-in controls, tho most still do not allow for IOT integration.
There are many videos on YouTube detailing Pool automation systems, and some use the very inexpensive remote controlled relay called Sonoff. This device is very versatile and can be firmware flashed to provide additional capabilities beyond factory. The Sonoff device is basically a relay and works with Alexa and Google out of the box but there is a way to also flash it to also be HomeKit compatible with the Apple HomeKit (Siri) ecosystem. With flashed aftermarket firmware, the HomeKit compatibility becomes native, so no bridge is required.
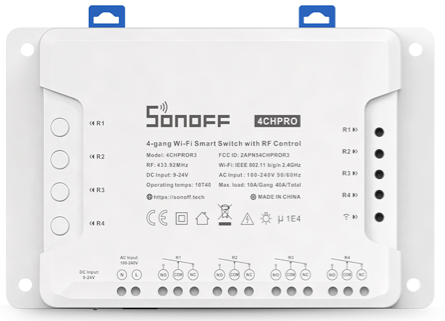
During research for the Sonoff devices and while reviewing automation projects it was discovered that there are at least 3 main categories of this device. A single channel/relay model that is featured in most automations, a dual channel/relay model and a four channel model that comes in standard and basic. Given the low cost of the device, going for the top of the line Four Channel Pro model was a no brainer. By setting up a four channel unit you also future proof your automation and have room for expansion.

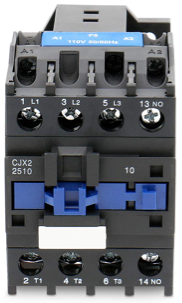
The Sonoff Pro finally selected is also R3 or revision 3, as the current latest model, and comes with 4 independent (dry) relays each capable of 250v @ 10A. This is a lot of power and makes the unit suitable for pretty much any task. However when controlling pool pumps above 1hp or any motor it is best to use a more powerful contractor to turn the pump or motor on-off due to high inrush current, and just allow the Sonoff relay to be the controller for the contactor. This Sonoff model also uses screw terminals so it accepts more types of wire and aside from a 9-24V AC input is also able to be powered directly from 120V AC so no need for bulky power adapters or transformers. The contactor is NO meaning it’s normally open and when power is applied to the coil it passes current between each pair of contacts, just like a regular wall switch, but this one does it on 4 separate channels or poles.
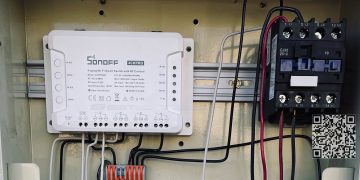
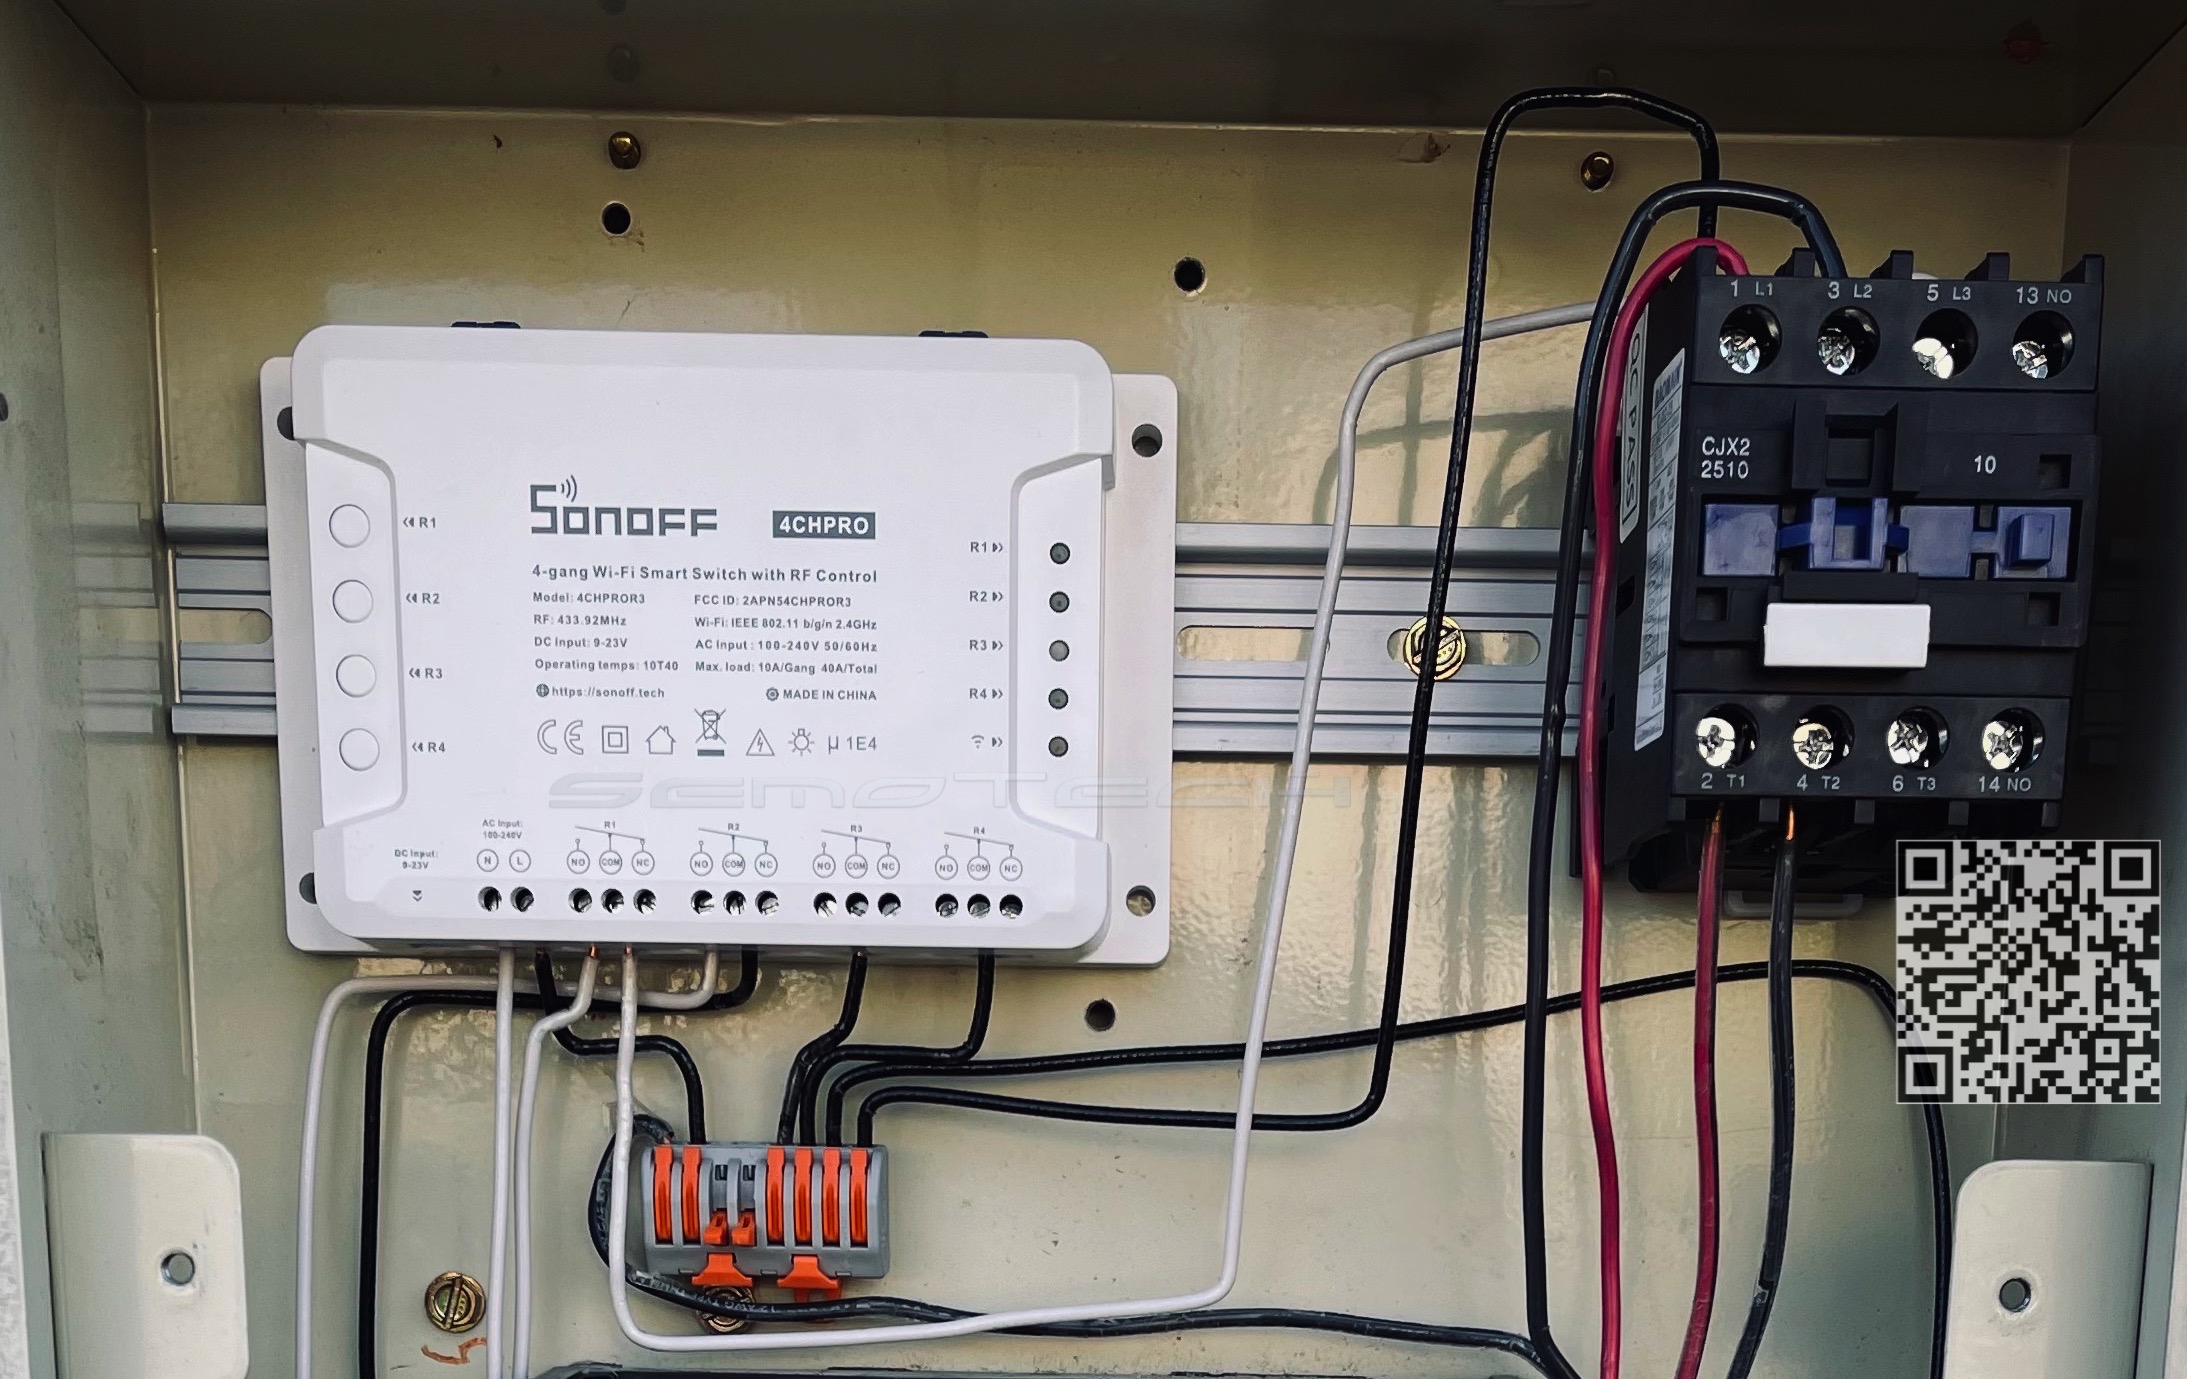
The process to upgrade the existing pool power and control panel was very straight forward. Remove the old pool pump mechanical system and light toggle switch, and wire in the new remotely controlled Sonoff, along with a powerful contactor capable of switching the pool pump on/off with ease. In the process the old GFCI outlet was also replaced, since it was a bit older, and it’s best not to take chances as it protects the underwater pool light.
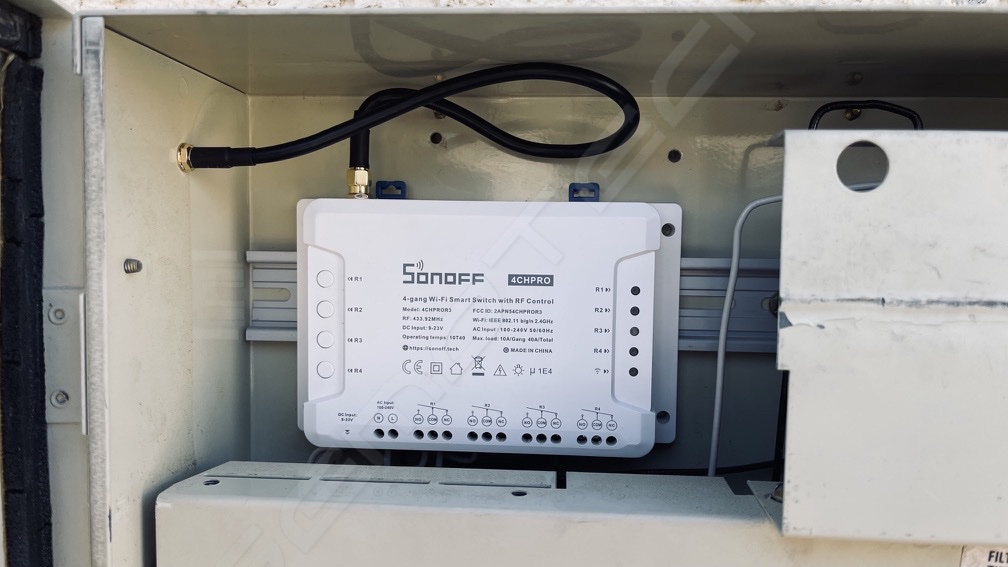
To mount the Sonoff and the large contactor a DIN rail was used. It is a very simple aluminum bar onto which devices can easily attach to. It just had to be cut to size so it fits in the existing metal power box. The power box already had several screws in place which were used to attach the DIN rail. To make the wiring connection easier Lever Nuts were used as this makes the setup a lot cleaner and easier to trace and service.
For the 120v standard connections 14 gauge Solid Copper Insulated cable was used. For the contactor main connections 12 gauge.
The Lever Nuts allow for a clean and easy to follow connection path and they mounted with the same screws found in the power box. Using wire nuts is always an option but not as clean and easy to re-configure if needed. Also connecting 3 or more 12 or even 14 gauge wires together makes it harder to handle and takes up more space.
The Sonoff was powered directly from 120V AC straight off the breaker panel in the power box.
The contactor had the Hot leg (A1) connected to the shared Hot through an 8-pin Lever Nut and the Neutral was switched through the Sonoff’s 1st Relay.
The Pool Lights have the Hot leg going through the GFCI outlet and the load side is switched by the 2nd Sonoff relay.
The remaining two relays on the sonoff are for future use, possibly to another outlet on the left side of the power box allowing control of a salt cell. The outlet will be switched through the 3rd Sonoff relay.
Finally the 4th Sonoff relay will be used to control a Natural Gas Pool heater once its installed. Since it will be gas, the electrical load will be minimal as with the Light and Salt Cell, so and there is no need for another large contactor. Having 4 relays opens up easy expansion.


Takeaways:
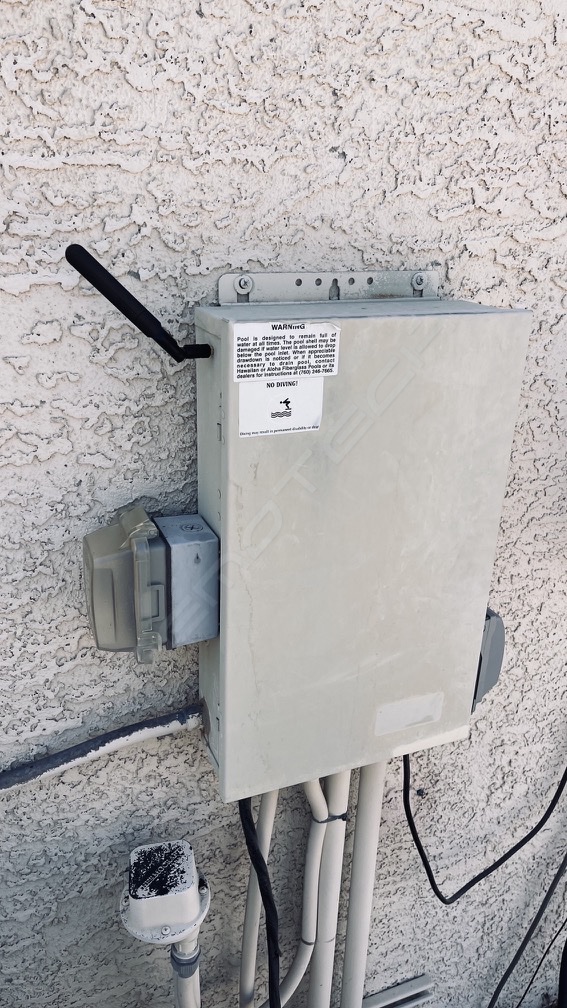
1 – Interestingly enough there were concerns that the metal power box will block the 2.4Ghz WiFi the Sonoff needs for control and was contemplating soldering an antenna, a risky move that could have damaged it. The WiFi signal inside the metal Power box is about -72 dBm, which while low seems to be enough to trigger the relays, but I am getting some disconnections.
2 – Since the 120v electrical wiring connectivity was designed and implemented in real-time, the entire retrofitting process & testing took about 4h due to neatness concerns, and making sure everything was connected properly. Do ensure you do the same if you do it yourself.
Here is the list of parts used:
Sonoff 4Ch Pro R3 – HERE (buy one pre-flashed for HomeKit, or flash yourself – HERE)
Tech diagram and wiring examples – HERE
3-Pole Contactor (NO) – HERE
Lever Nuts Kit – HERE
12 Gauge Insulated Solid Copper Cable – HERE
WiFI UPGRADE on 4/10/2023:
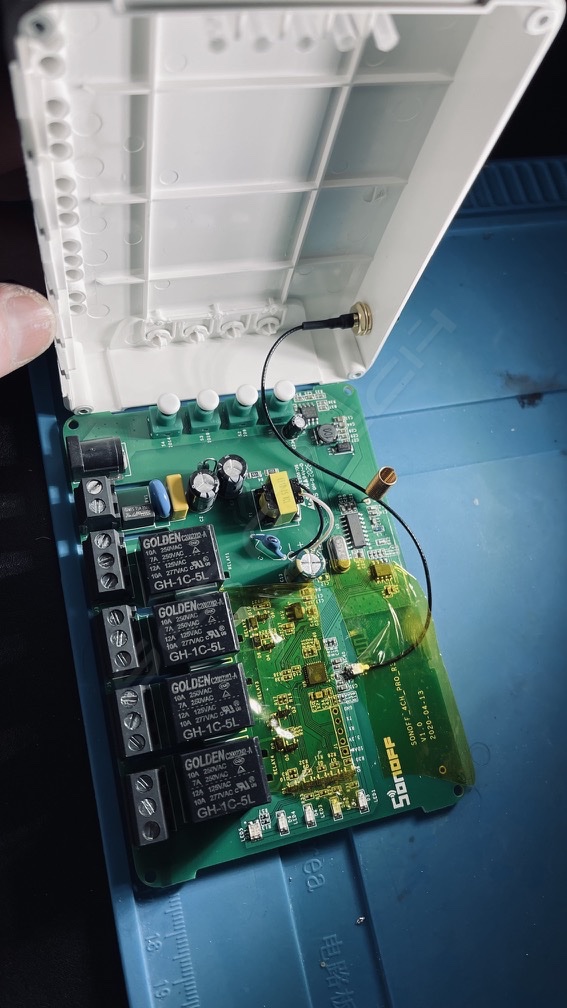
I was having a lot of intermittent WiFi connectivity issues due to the fact that the metal sub-panel box is acting like a Faraday Cage, and restricting RF signals. I therefore bit the bullet and performed microscopic soldering work to install an external antenna connector and antenna in order to fix this last issue.
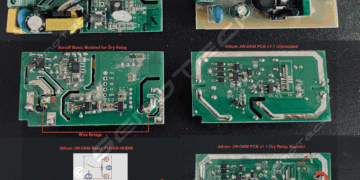
The Sonoff 4CH Pro uses an internal 2.4GHz WiFi antenna, printed on the PCB itself. While this is normally sufficient, by placing the unit inside the metal box has rendered it almost useless, and since Sonoff does not offer a model with an external antenna, I decided to install my own.
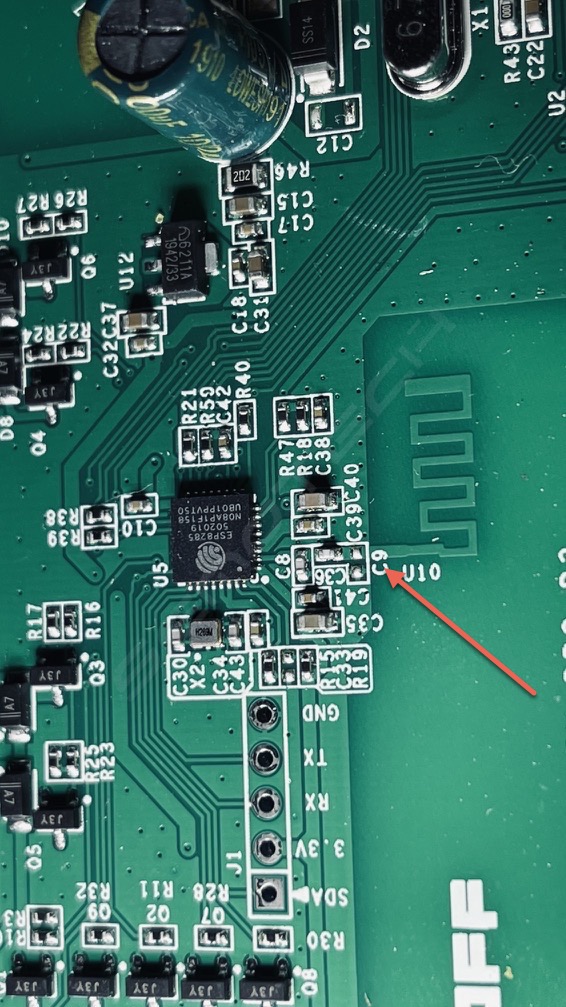
The 1st challenge was to identify the antenna main/center lead as well as the ground connections. Using a multimeter I tracked them down. The connection point right above the “9” in the “C9” label in the picture here is that center lead. The connection to the left of it is ground and there is also ground where the “C3” label is on the right side. Since the right side did not have exposed copper I removed the coating and made my own.

To make this as practical as possible I used these almost microscopic 3mm x 3mm IPX U.FL SMD SMT PCB Mount Socket antenna connectors I found HERE.

I also purchased the cable w/ and external WiFi antenna, see HERE

And finally I got small RP-SMA extension cables to reach the side of the metal box, see HERE.
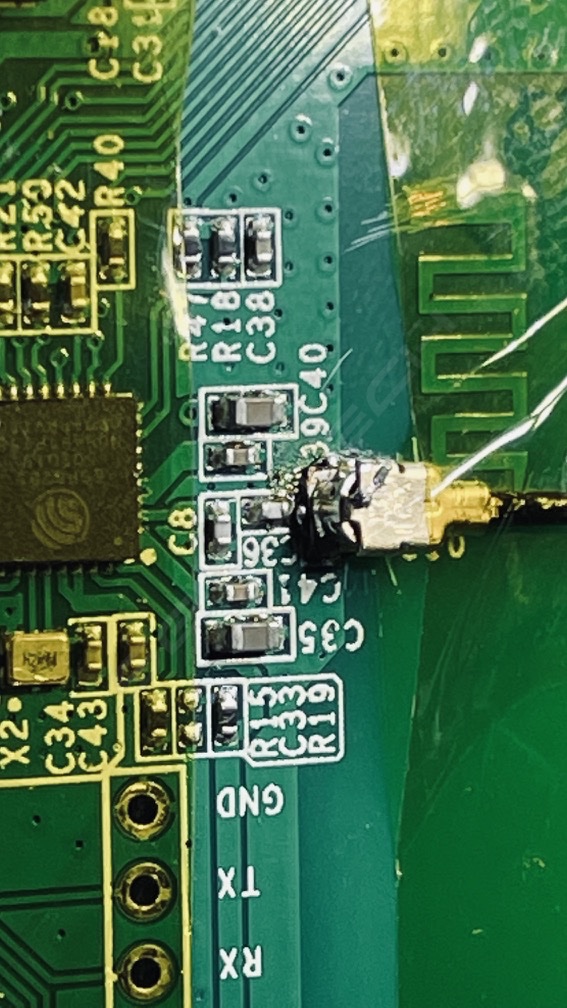
 I was unable to solder the 3mm connector directly given its minuscule size, and also since you cannot get underneath it, so I used a hot air rework gun set to 800 deg F air temperature. This melted the solder underneath the connector and allowed for a good solid connection. I then proceeded to drill a small hole in the top of the case as well as in the metal power panel, and connect everything together.
The result? SUCCESS!
WiFi signal strength has improved from -72 dBm to -54 dBm, a huge change for the better, and now the unit stays 100% solid connected to my WiFi!
